At Home on the Bay

DIY, Decor and More

  • At Home on the Bay
  • Home
  • About
    • About
    • Advertising and Disclosures
    • Featured
  • My Home
    • Blue Hill Bay Home Tour
    • Cleveland Home Tour
  • Inspiring Homes
  • Projects
    • Craft Projects
    • Sewing Projects
    • Furniture Projects
    • DIY Lighting Projects
    • Decor Projects
  • Recipes
  • Free Printables
You are here: Home / DIY / Lace Trimmed Standard Pillowcase Tutorial

Lace Trimmed Standard Pillowcase Tutorial

February 18, 2013 By Mary

DIY Lace Trimmed Pillow Cases: At Home on the Bay

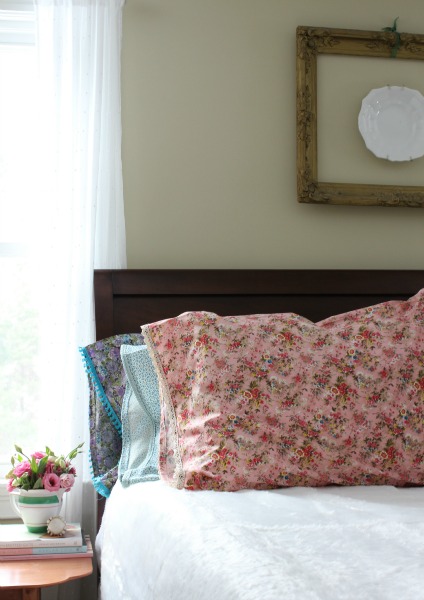
Nothing says spring like pastel flowered fabrics and fresh pink roses, and I’m so ready to welcome the warmer nights and longer days after a few weekends of snow. To add a touch of spring, I made some simple standard pillowcases with French seams and lace trim.  They are easy to make and a good project for a beginner sewer.

DIY: Lace Edge Pillow Case

Materials for One Standard Pillowcase with Lace Trim:

1 yard of 45″ wide fabric

 1-1/2 yards of lace trim

 coordinating thread

sewing machine, iron, scissors, pins

Pre-wash and dry the fabric and trim.

DIY: Lace Edge Pillow Case
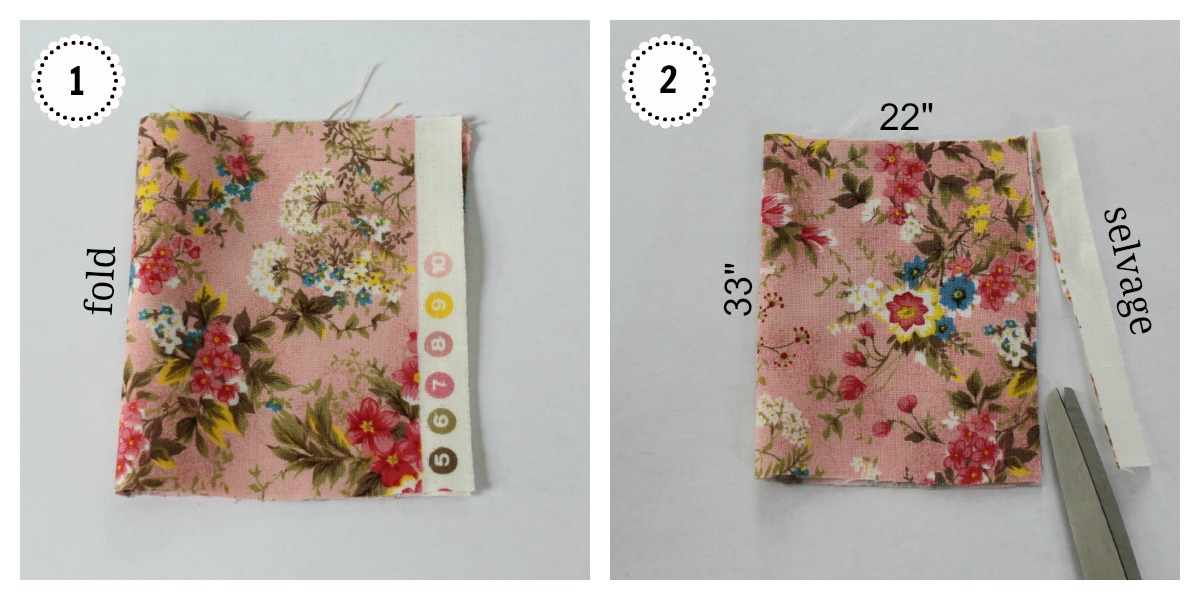
1. Fold fabric in half with selvage edges together, press.

2. Cut length to 33 inches long and trim selvage edges off.

Standard Pillowcase with Lace Trim Tutorial

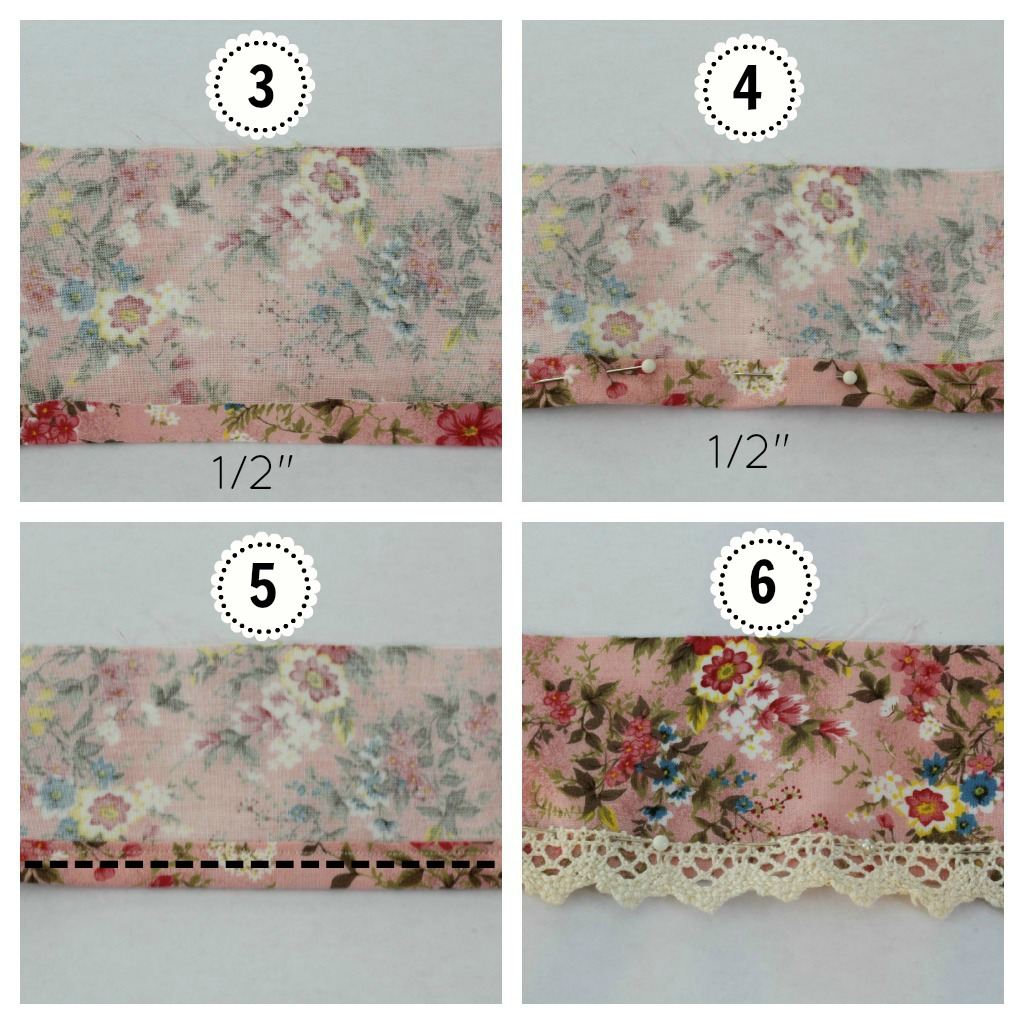
3. Open fabric out with wrong side up.  Turn up bottom raw edge 1/2 inch and press.

4. Turn up bottom edge 1/2 inch again and press.  Pin in place.

5. Using a 1/4 inch seam allowance, sew.

6. Turn fabric right side up with hem at bottom.  Pin trim to top of hemmed edge using sewing line as a guide (cover sewing line with trim). Using a straight or zig-zag stitch, sew trim in place.

DIY: Lace Edge Pillow Case
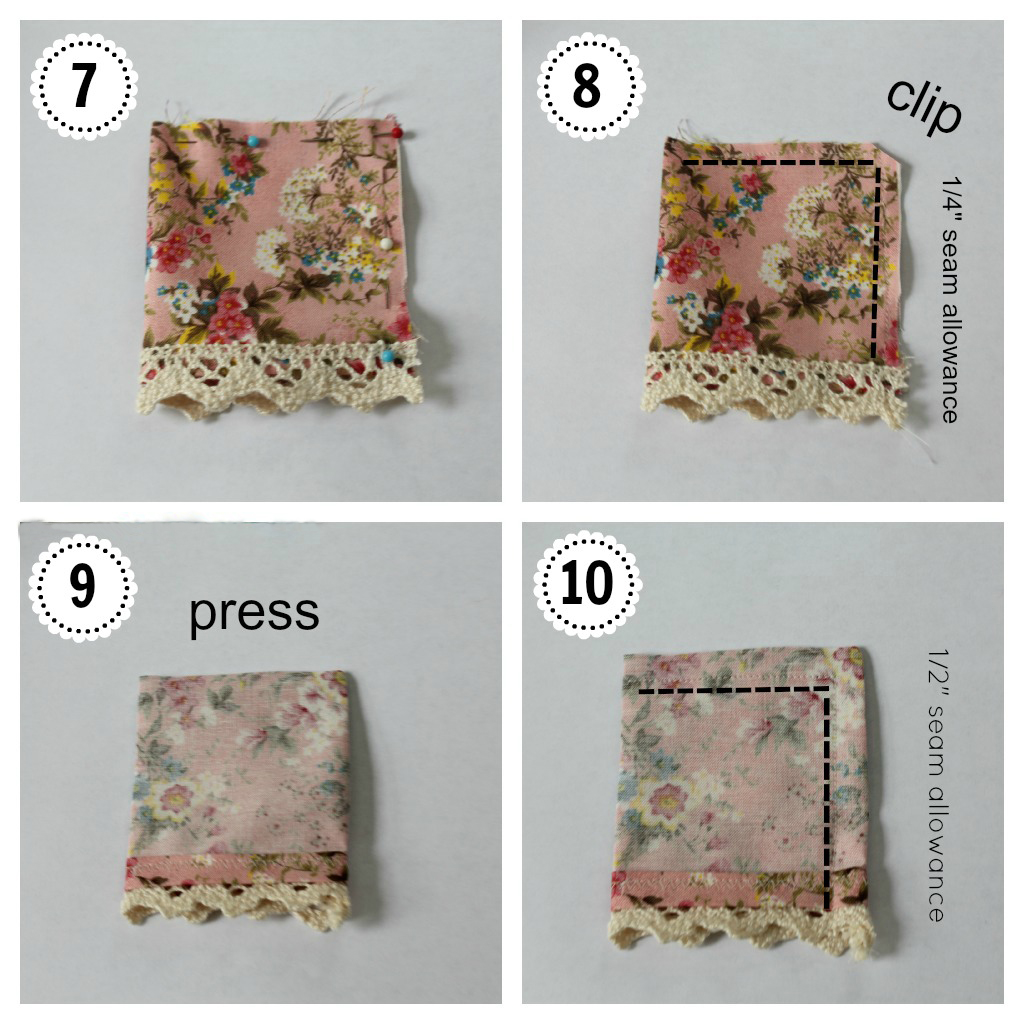
7. For French seams, fold fabric wrong sides together with hem at bottom.  Pin raw edges together.

8. Using a 1/4″ seam allowance, sew raw edges. With scissors, clip corner being careful not to clip any stitches.

9. Turn pillowcase inside out and press.

10. Using a 1/2″ seam allowance, sew.  This step encases all the raw edges.  Turn pillow case right side out and press.

You are done!

DIY: Lace Edge Pillow Case

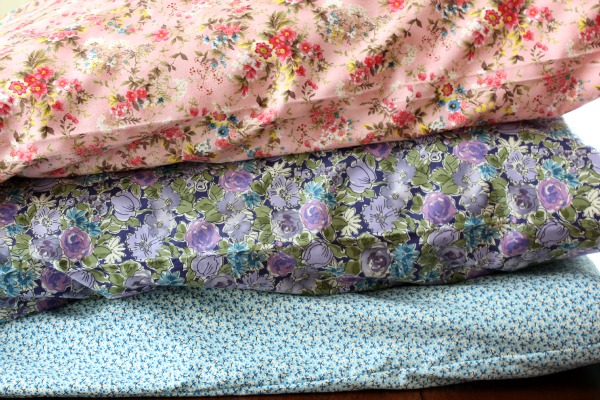
You can make one, or you can make a whole bunch like I did.

DIY: Lace Edge Pillow Case

I’m ready for spring.

If flowers aren’t your thing, these would be beautiful in linen and lace or white cotton and lace.

Find tips for adding lace to store bought pillowcases here.

Find more DIY pillow ideas here.

Sharing with:

Jennifer Rizzo

fb-share-icon
Tweet
Pin Share
«
»

Filed Under: DIY, pillows, sewing, tutorials

Comments

  1. Vickie says

    February 18, 2013 at 7:08 am

    Well there it is in black and white…..and pretty spring florals! I want to get started on my redwork pillowcases but I have to stitch up the pillowcases first. How’s that for timing?! The fabrics you’ve chosen are lovely. Thanks for the tutorial, Mary!

  2. cassie says

    February 18, 2013 at 8:31 am

    these are ADORABLE!!!!! i love the look!!!! i may need to try this on emmy’s bed.

  3. Carol says

    February 18, 2013 at 8:31 am

    How much fabric would you use for King size pillowcase?
    I love your fabric selections.

    • Mary says

      February 18, 2013 at 10:35 am

      For a king size pillow case you would need 1 1/4 yards of fabric and 1 1/2 yards of trim (the trim is the same for either size). Follow the instructions as for the standard pillowcase except adjust the length from 33″ to 43″ long. King size pillowcases are approxiamately 10″ longer than standard. I hope that helps you.

  4. Julie says

    February 18, 2013 at 10:41 am

    Lovely! I might need to make a couple for spring……J

  5. Bernita says

    February 18, 2013 at 10:48 am

    Those are so pretty!

  6. Bernita says

    February 18, 2013 at 10:51 am

    Please add some share buttons to your site so people can share your posts on facebook, pintrest, G+, etc…

  7. Terri says

    February 18, 2013 at 12:40 pm

    What a lovely nod to spring 🙂

    I’ve made some flannel pillowcases to be bed and pillow covers for the cats at the no-kill shelter where I volunteer. (Of course, I didn’t bother to put decorative trim on them.) French seams are absolutely wonderful as these pillowcases get rough use and hard washing!

  8. Inspire Me Heather says

    February 19, 2013 at 7:48 am

    What a pretty way to finish a pillow – they turned out just lovely!

  9. Virginia says

    February 20, 2013 at 8:08 am

    Love this idea! Thank you.

  10. Denise says

    February 20, 2013 at 9:15 am

    These are so cute I am going to give it a try!!
    Thanks for the inspiration!
    Denise

  11. NancyB in AZ says

    February 20, 2013 at 11:41 am

    Those are so sweet! A great idea to chase the winter blues. Thank you for sharing.

  12. Angela @ Cottage Magpie says

    February 21, 2013 at 8:35 pm

    Oh I love these!! I was just gearing up to learn how to hand crochet the edging — and I may still do that — but meanwhile, this is so pretty and cute and I have lots of trims that need using. I know what I’m going to be working on as soon as I get well!! ~Angela~

  13. Jessica @ Dear Emmeline says

    February 21, 2013 at 10:16 pm

    your fabric choices are just lovely Mary!

  14. lisa says

    March 4, 2013 at 6:21 am

    I really love your choice of fabrics, and the trims take it over the top! These are a breath of fresh air! Happy Monday from the enchanted oven.
    xo,
    Lisa

  15. Little Bit says

    March 4, 2013 at 10:02 am

    very pretty. when I was a little girl, my great, great aunt used to crochet lace on pillowcases, this is a much easier and just as pretty way to accomplish the same look. I’m pinning. Little Bit from http://www.DecorateWithaLittleBit.com

  16. Dawn @ Inspired Living says

    March 6, 2013 at 9:48 pm

    I love this idea! I love to use all white bedding and think these floral pillows would be such a great way to add spring to the room! I really like the special touch of adding the lace. I’m a beginner sewer, so I might have to try this! Pinning. I found you at 6 days of spring link party!

  17. gale vanderella says

    May 20, 2013 at 10:58 am

    Thanks so much for simplifying how to sew a pillowcase for me:) Have seen many others on pinterest but this one is so simply for me with all the photos! Thanks again!

  18. mari says

    June 1, 2013 at 1:26 pm

    Lovely! I’m going out now to get some fabric. Thanks for the idea, it will set off my bedroom perfectly.

  19. Lisa says

    June 1, 2013 at 10:04 pm

    Ran into this via Pinterest … love it! And I think it’s brilliant to make a “mini” one for pictures! I haven’t seen that before but much easier to view online.

    Thanks!

  20. deborah says

    August 28, 2013 at 11:59 am

    I’m loving these pillow cases, and can’t wait to get started. I’m intrigued by the French seams, but I’m having a hard time envisioning the end result. Does encasing all the raw edges just make it prettier on the inside? Not judging, I think it’s a nice touch. Lol!

  21. Prince Snow Fram says

    September 3, 2013 at 3:21 pm

    Saw this image somewhere….tracked it down by your copyright! I LOVE these and you should sell them in an Etsy shop!

  22. Mary says

    January 20, 2014 at 10:22 am

    If you are making two pillows you will need 2 yards of fabric and 3 yards of trim. If you buy fleece, I would make the whole pillow in the fleece, and wash the fabric before sewing. I’m not sure how much your fabric will shrink. Each fabric is different. Sometimes I ask the clerk at the fabric store her opinion on whether the fabric will shrink a lot or not.

  23. Amanda says

    January 21, 2014 at 2:32 pm

    These are SO pretty! I shared the link on my Facebook page and everyone loved them! https://www.facebook.com/photo.php?fbid=10153754069500217&set=a.353593675216.349539.323548680216&type=1&stream_ref=10

    • Mary says

      January 23, 2014 at 11:53 pm

      Thank you so much Amanda!

  24. Dani Gay says

    July 26, 2014 at 5:26 am

    So inspired by this post. I saw it and immediately wanted to put my Polynesian twist to it for island home decor. Your tutorial is simple and easy to follow. Love your blog. I am a beginner blogger and getting more regular about my posting. I am working on my own design business from home, very slowly. I really enjoy your posts, they inspire my creativity! Mahalo for sharing. ~ Aloha, Dani

  25. Sally says

    August 5, 2014 at 4:12 pm

    Hi there, just saw you featured over at Jennifer’s Charming Home Series. Your home and blog are both so beautiful and inspiring. The pillows you made are so sweet, I just love the mix of fabrics!!
    Sally @cottagefix

  26. Chris says

    September 17, 2015 at 2:25 pm

    Hi, these are lovely. For the blue trim, does it come…. bound? Did you have to snip it between each tassel to free the threads? I love this look, but couldn’t find anything at the fabric store similar. I am wondering if I am looking for the wrong item. This appears to look more like rail road tracks when you buy it, then individual tassels.
    I really love how you made these. Thanks for the tutorial. I’m a beginner (can ya tell? 😉 ) so it’s quite helpful!

Trackbacks

  1. If I Didn’t Have A Day Job: February Edition | The Little Red Owl says:
    February 19, 2013 at 2:12 pm

    […] lace trimmed pillowcases are so beautiful I think I would have to buy more beds to put all of the pillows on […]

  2. Tutorial: Vintage-inspired lace-trimmed pillowcases | Sewing Patterns says:
    February 20, 2013 at 10:10 pm

    […] These vintage-inspired pillowcases by Mary from At Home on the Bay are so pretty stacked on a bed!  She shows how to make them from floral cotton fabric and lace trim.  Get the tute. […]

  3. Amy’s Notebook 02.27.13 | The Motherload says:
    February 27, 2013 at 7:58 am

    […] Source: At Home on the Bay […]

  4. Polly's Picks: BEST Shabby Lifestyle Decor & Accessory DIY Tutorials EVER - Mrs. Polly Rogers | Decorate, Make, Create! | Mrs. Polly Rogers | Decorate, Make, Create! says:
    March 16, 2013 at 2:08 pm

    […] 23.  Make charming Shabby pillow cases from scratch with this tutorial:  http://www.athomeonthebay.com/2013/02/lace-trimmed-standard-pillowcase-tutorial.html […]

  5. Happy Easter | Bohemian Treehouse says:
    March 29, 2013 at 10:19 am

    […] Check out these fabulous DIY pillowcases !!  […]

  6. Reading: Pretty Pastel Style says:
    April 8, 2013 at 1:26 pm

    […] For a tutorial on how to make your own lace trimmed pastel pillowcases click here. […]

  7. Five DIY Gifts for Mom says:
    May 8, 2013 at 4:31 am

    […] Lace Trimmed Standard Pillow Case Tutorial: You could make Mom a lace trimmed standard pillow case. There is a detailed tutorial with lots of pictures. It takes one yard of fabric. A beginner sewer could do this project. […]

  8. Tutorial: Vintage-inspired lace-trimmed pillowcases | Sewing | CraftGossip.com says:
    July 15, 2013 at 3:20 pm

    […] These vintage-inspired pillowcases by Mary from At Home on the Bay are so pretty stacked on a bed!  She shows how to make them from floral cotton fabric and lace trim.  Get the tute. […]

  9. Zelf brocante kussenhoezen maken - Alles Brocante says:
    October 31, 2013 at 10:14 am

    […] Beeld via athomeonthebay.com […]

  10. Top Five Popular Posts from 2013 - At Home on the Bay says:
    December 30, 2013 at 5:07 am

    […] 1. Lace Trimmed Standard Pillowcase Tutorial […]

  11. Friday Favourites - Small Home Big Start says:
    March 10, 2014 at 2:40 pm

    […] Craft: These vintage inspired pillowcases are a great way to spruce up a room for spring and had a fun layered effect. I love the vintage […]

  12. Hobzy Hot 100 Bloggers: At home on the Bay | The Hobzy Blog says:
    April 5, 2014 at 10:10 am

    […] your bedroom into a French country cottage with these dreamy, lacy pillow cases from At Home on the Bay (as if it wasn’t hard enough to leave already!) This is a great example of a French seam. A […]

  13. Mismatched Floral Bedding - At Home on the Bay says:
    March 11, 2015 at 5:56 am

    […] Lace Trimmed Standard Pillowcase Tutorial […]

  14. 20 Ways to Sew a Pillowcase - and WINNER! - Tidbits says:
    April 9, 2015 at 1:45 pm

    […] These pillowcases looks simple enough for any level of sewer, but are so beautiful with the added trim and floral fabrics.  From At Home on the Bay […]

  15. 10 Fun DIY Pillowcase Projects says:
    June 22, 2015 at 8:26 am

    […] You can update some of your older, vintage pillowcases with an easy trim. All three of these beauties were given even more charisma with the lace addition. {found on At Home On the Bay} […]

  16. Ten Fun DIY Pillowcase Projects - 12thBlog says:
    August 20, 2015 at 8:13 pm

    […] {found on At Home On the Bay} […]

  17. Pinterest Feature Friday - PFF #197 - The Scrap Shoppe says:
    September 11, 2015 at 6:00 am

    […] I need to make up some of these Lace Trimmed Pillowcases – they are so pretty! Pinned from At Home on the Bay […]

  18. Pinterest Feature Friday - Mine for the Making says:
    September 11, 2015 at 6:31 am

    […] I need to make up some of these Lace Trimmed Pillowcases – they are so pretty! Pinned from At Home on the Bay […]

  19. PP: My So Called Crafty Life | Yesterday On Tuesday says:
    September 12, 2015 at 9:47 pm

    […] I need to make up some of these Lace Trimmed Pillowcases – they are so pretty! Pinned from At Home on the Bay […]

Hi There, I’m Mary!

Welcome to At Home on the Bay where I share my love for DIY, decorating, sewing, thrifting and baking all while living in our little slice of Heaven on Blue Hill Bay.
. Read More…


Please follow & like us :)

RSS
Follow by Email
Facebook
Facebook
fb-share-icon
Pinterest
Pinterest
fb-share-icon
Instagram


Search This Blog

Categories

Like us on Facebook!

At Home on the Bay

Please follow & like us :)

RSS
Follow by Email
Facebook
Facebook
fb-share-icon
Pinterest
Pinterest
fb-share-icon
Instagram

Copyright © 2025 · Darling theme by Restored 316

[footer_backtotop] · · · Copyright © 2025 At Home on the Bay · · · Log in

»
«