
DIY: Horchow Natural Cane Lamp Shade
I love this Horchow natural cane lamp shade (below), but not it’s $275 price tag.

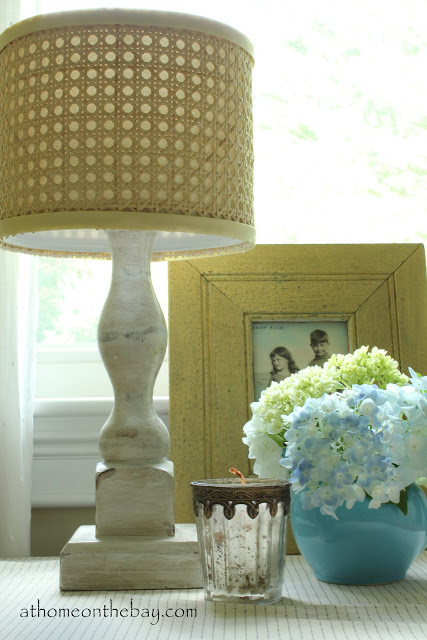
Like a true DIYer I came up with a way to make a shade inspired by the original.
Materials Needed:
drum shade
bias tape
hot glue gun
scissors

I bought the pre-woven caning at Rockler, but there are other sources on-line. It is sold by the inch, so I measured the circumference of the shade and bought enough to go around the shade with some overlap. It comes in different widths, so you can buy the width that is closest to your shades length. The caning is easy to cut with scissors. I cut it to the exact measurements of the shade overlapping one set of open weave holes. I found it to be very pliable and didn’t have any problems with wrapping it around the shade, but it can be dampened to make more pliable.

I hot glued the canning at the seam.

I bought the bias tape at Joann Fabrics. You could also use twill tape. The bias tape happened to be closest in the color wanted. I hot glued the bias tape to the edge of the lamp shade. I turned under the cut edge before gluing to give it a finished look.

The caning can also be stained to make it darker (see below). Stain the caning and let it dry before you glue it onto the shade. I used a darker twill tape to finish the edges of this pendant shade.

This is the natural cane lamp shade (below).

I made both lamp shades for under $22 each.
I have a Pottery Barn inspired shade coming up next.

Mary,
I LOVE this project! I wish I would have thought of this! I’m adding this to my facebook page 🙂
blessings,
karianne
So cute! I love coastal design and this would go perfectly. Found you over at Karianne’s fb page. 🙂
This is truly awesome!!
I am SO doing this!! Thank you for the tute and the link to purchase!! 🙂 AND THE IDEA!
LOVE it and pinning it! I desperately need some lampshade redo’s and this is perfect. Thanks for the idea!
GREAT DIY! Love to see such a great project!
Aren’t you clever?! I love your new natural looking shades!
I love this! You are soooo creative, hugs- Tanya 🙂
OOOO! I love cane stuff so much! I’ve been on the hunt for some chairs but never even thought about buying the cane and getting all DIY on it! Great job!!!
Thanks so much for linking this up; it’s really an awesome project!
this is a great shade.
wow, talented AND so darn smart. this looks every bit as good as the expensive one. Great Job!!!
Oh my gosh, that is absolutely brilliant! I’m so impressed! It really does look just like the expensive Horchow shade.
Love this!! Thnx so much for the tutorial & the source for purchasing the caning. Blessings!!
Gotta love a good lampshade – and these are knockouts! Kudos on a job well done. 🙂
Following you – first time visitor from Funky Junk.
-Revi
What a cool way to add texture to a room. You are a champion copy cat!
Very pretty Mary! I love the texture of those shades!
Wow this is fabulous!!! You did such a great job, nicely done! Very clever!
So awesome!!! I never would have thought of this and it looks just fantastic. 🙂 Thanks so much for sharing it with us at Inspiration Friday this week!
Vanessa
Love, love, love!
A high five for you! So clever this. I love the syling in your natural cane picture too.
Love it so much that I featured it today on A2D. Thanks for the inspiration!! Really a great project.
Very cool project – looks just like the $275 one!
Stunning. This is why I love DIY so much – you can save so much money. You did a fantastic job.
Love this! Have an old rooster lamp sitting on my bar that needs help, just might have to play with this idea and see what it ends up like. Thanks!!!
Very cool, looks beautiful and you saved a ton! I have to figure out a formula for getting the right size/shape shade for a lamp.
This is Great! Just found you would love it if you would like to share it at http://www.onemoretimeevents.com/2012/07/one-more-time-features-linky-party-2.html
now subscribing to your blog!
Love this lamp! I am excited to be following your blog. I’d love to have you come check out some of my simple ideas over at dosmallthingswithlove.blogspot.com.
Nancy
I found you on Knock Off Decor and love these lamp shades! I have a shade I’ve been wondering what to do with and I think this might be it! It is a great look and would be super easy to change out later if you ever got tired of it. I’m excited to give it a go. Thanks for the inspiration.
Hi- just wanted you to know I featured your amazing lampshade transformation on my blog today-Have a lovely weekend!