At Home on the Bay

DIY, Decor and More

  • At Home on the Bay
  • Home
  • About
    • About
    • Advertising and Disclosures
    • Featured
  • My Home
    • Blue Hill Bay Home Tour
    • Cleveland Home Tour
  • Inspiring Homes
  • Projects
    • Craft Projects
    • Sewing Projects
    • Furniture Projects
    • DIY Lighting Projects
    • Decor Projects
  • Recipes
  • Free Printables
You are here: Home / pillows / Swiss Cross Pillow

Swiss Cross Pillow

January 24, 2012 By Mary

Swiss Cross Pillow Tutorial

Materials to make a 16″ pillow:
1/2 yard of linen
8 inch square of felted wool
Swiss Cross Template
16″ Pillow Form
Coordinating DMC Floss
Thread
Pins, Tapestry Needle, Scissors, Sewing Machine, Iron, and Ironing Board
1. Print cross template and cut out.  Pin to wool square and cut shape out.
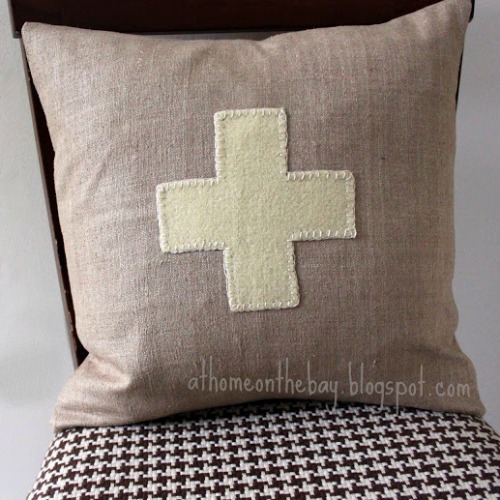
2. Cut one 17 ” square and two 17″ x 11″ rectangles out of linen.  Pin cross to center of 17″ square.  Using 3 strands of the embroidery floss and a tapestry needle, blanket stitch cross onto linen.
Blanket stitch: Come up through the back of the linen to the edge of the cross (A).  Bring needle back down at (B) catching cross fabric and linen.  Come back up through linen to edge of cross at (C) making sure you catch the thread under the needle. Continue in this manner all the way around cross.
 See photo above.

.

3. To make the envelope pillow, take the two 17″ x 11″ back pieces and with the right side facing down on the ironing board, turn up raw edge 1/4″ on one of the 17″ sides and press.  Turn up another 1/4″ again and press.  Pin and sew just inside folded edge. Repeat with other 17″ x 11″ piece.
See photo below.

4. Lay the square with the blanket stitch cross facing up.  Take one the the 17″ x 11″ pieces and lay it face down on top of the square lining up the 17″ raw side with the edge of the square and with the finished edge towards the middle.  Next, lay the second back piece face down with it’s raw edges lined up to the bottom square and the finished edge towards the center. The centers will overlap.  Pin edges together and using a 1/2″ seam allowance sew all the way around the outer edge.  I zig-zag stitched the raw edges to prevent fraying.  Turn pillow right side out and stuff with a 16″ pillow form.

See photo below.
Enjoy!

Link to printable instructions and Swiss Cross template. 

Find more DIY pillow projects here.

fb-share-icon
Tweet
Pin Share
«
»

Filed Under: pillows, sewing, tutorials

Comments

  1. ReFresh ReStyle says

    January 25, 2012 at 8:34 am

    I love this and I may just have to copy 🙂 love the colors!
    Debbie

  2. thistlewoodfarm says

    January 25, 2012 at 5:40 pm

    This is absolutely adorable! I am pinning this! Visiting from Savvy Southern Style~
    blessings,
    karianne

  3. Chatty Chics says

    January 29, 2012 at 10:54 am

    So stinkin’ cute! LOVE this! Another great project of yours Mary! Thanks for showing off at my place!
    Melody
    ChattyChics.com

  4. Courtney ~ French Country Cottage says

    February 2, 2012 at 11:53 am

    Darling pillow!! Thanks for linking up at Feathered Nest Friday! Hope to see you again at this weeks party!

Trackbacks

  1. Living Room Progress says:
    October 29, 2012 at 7:44 pm

    […] Swiss Cross pillow tutorial […]

  2. Anthropologie Inspired Pillow says:
    October 29, 2012 at 7:48 pm

    […] you are looking for other pillow ideas, here is a link to the Swiss Cross Pillow Tutorial. Sharing with:Tatertots and JelloFunky Junk InteriorsBe Different Act NormalI Heart Nap […]

  3. Downstairs Guest Bedroom Tour says:
    May 6, 2013 at 8:51 pm

    […]  Swiss Cross Pillow Tutorial […]

  4. The Swiss Cross Epidemic of 2014 | June's Child says:
    May 29, 2014 at 8:19 pm

    […] super easy to rip off- I mean, be inspired by. I found some cool tutorials for cushions here, here and […]

  5. SWISS CROSS EPIDEMIC | June's Child says:
    June 30, 2014 at 11:05 pm

    […] If you’re poor (like me) you can DIY it because it’s super easy to rip off- I mean, be inspired by. I found some cool tutorials here and here. […]

Hi There, I’m Mary!

Welcome to At Home on the Bay where I share my love for DIY, decorating, sewing, thrifting and baking all while living in our little slice of Heaven on Blue Hill Bay.
. Read More…


Please follow & like us :)

RSS
Follow by Email
Facebook
Facebook
fb-share-icon
Pinterest
Pinterest
fb-share-icon
Instagram


Search This Blog

Categories

Like us on Facebook!

At Home on the Bay

Please follow & like us :)

RSS
Follow by Email
Facebook
Facebook
fb-share-icon
Pinterest
Pinterest
fb-share-icon
Instagram

Copyright © 2025 · Darling theme by Restored 316

[footer_backtotop] · · · Copyright © 2025 At Home on the Bay · · · Log in

»
«