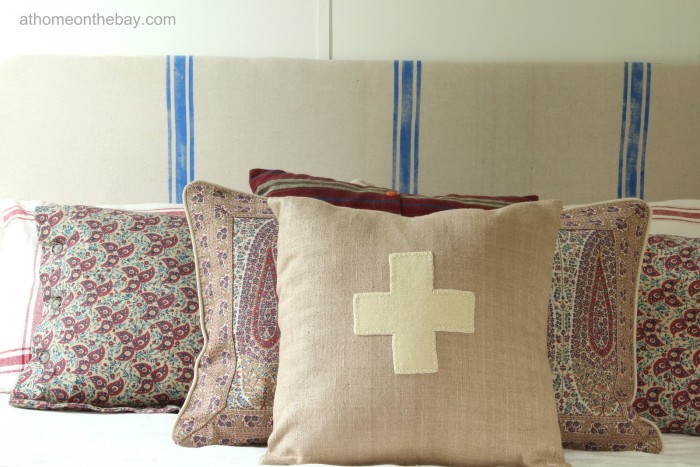

DIY: French Linen {Like} Headboard
Enter Martha Stewart.

Supplies for making the Faux French Linen:
2 yards of 45″ wide unbleached osnaburg or linen
Martha Stewart Crafts Patterning Tape
Martha Stewart Crafts Stencil Tape
Martha Stewart Crafts Multi-Surface Satin Acrylic Paint – Indigo
Foam brush
Pencil
Ruler
Newspaper for keeping the working surface clean while painting.

1. Find the center of the fabric (the one yard line) and make a light pencil mark.
2. Line up the stencil tape (3/4″ wide) with the line you just made.
3. Line up the 1/4″ patterning tape next to the stencil tape. Then line up another piece of 1/4″ patterning tape on the other side of the stencil tape.
4. On each side of the middle piece of stencil tape you will want to have 2 – 1/4″ strips of tape and then 3/4″ strips on each end.
5. Pull off the center piece of tape and the two of the 1/4″ strips as in photo.
6. You should have something that looks like this. I repeated this three times evenly spaced across the fabric.
Press down all the tape. You can use a brayer for this, but I used my fingers.
7. I lightly loaded the foam brush with the paint and painted in the direction of the tape to keep any paint from bleeding under the taped off area. I also placed newspaper under the fabric in case any paint bled through to the back side. Okay that is the last time I’ll talk about bleeding.
8. Remove the tape. You should have something that looks like this. I was so impressed at how nicely the tape worked. All the lines were clean and neat. I let the painted fabric dry over night. The next morning, I washed the fabric in a cold water wash (with my fingers crossed) and then dried it.
9. This is how it looked after. The paint faded in places. I had a perfectly aged French linen for about $20.

Supplies for a queen size headboard:
Plywood sheathing – 1/2″ thick and 4′ x 8′
3/4″ x 1-1/2″ pine boards for reinforcing
My husband worked on this part, so he has kindly given me the instructions below.

1. Layout 40″ x 62″ cut lines. You can have the plywood cut at Home Depot or Lowes.
2. Cut to size.
3. Use a suitable template to layout the radii on both top corners and cut.
4. Sand edges.
5. Wall cleat is cut at a 30 degree angle. Glue and screw cleats to the headboard leaving a 3″ border.
Here is the back view of what you end up with.

The next step is upholstering the headboard.
Supplies for upholstering:
2 yards of French Linen
Queen size High Loft Batting
Staple Gun and Staples


Hey I know that room! It looks so bright and lovely in there now, and that headboard looks amazing. You did a great job with it.
I did a very similar project for our dining room table runner, but would never have thought to make a fabric headboard. I love it!!! I need to make the decision of whether to buy a bigger bed for the master bedroom. If so, I’d have to lose our antique brass bed, but I wouldn’t mind making a headboard like yours to replace it. Genius! Pinned. :@
Mary,
This is an amazing project! From the faux linen and the stripes and the headboard! Love it all!
blessings,
karianne
Great JOB!!! I was just at Micheal’s and bought some of the Martha Stewart tape to make some French look-a-like fabric. I need to get on it, because your project is awesome!
~Angela
I love that you did those stripes yourself! Beautiful project!
Liz
Love how just a little washing gave it a great aged look. That tape is pretty cool, I’ve never seen that before. Great job!!
That is seriously fantastic!!! You did an amazing job and that tape is so neat. I love that you washed it and got that perfectly French-y look. Thanks so much for sharing this with us at Inspiration Friday!
Vanessa
I really love that you did your own fabric design! Your headboard turned out lovely… I also love the natural simple colours you have chosen to style this room. Rachael x
I absolutely love this – the faded blue stripes are perfect !
Great headboard!
Wow, I really love it. And the pillows are so great too.
Warmly, Michelle
This looks so great! I really like the front pillow too.
i just LOVE this, mary! tfs:)
That headboard is fabulous!!
That headboard is fabulous!!
I just learned to sew last night, but I’ve bookmarked this page for the adorable pillow when one day, 12 years from now, I can attempt it.